Slipcovered Patio Set

With our youngest graduating in a week(!!!)
we have been getting the house all shiny and ready
for our families to come and enjoy our celebration.
A very exciting event in our lives!

Today when I was cleaning the patio and washing the slip covers
 I realized how Uhhhgg- lee 
the cushions underneath were.   
  What a difference the covers have made to our patio....


compared to the before picture below...


I made these cushion covers from painters drop cloth 
as well as the pillow covers.
I stencilled the pattern on top with fabric paint. 
Not expensive, and exactly the look I am going for.


I purchased this planter last year at Winners\Home Sense,
I had no idea what I was going to plant in it, but I knew
it would work well with this refreshed patio.
This is my first year growing succulents....
I LOVE THEM! 
I am really hoping that they will overwinter for me.
Hope you enjoyed seeing the transformation.

Xeriscaping Our Front Garden


I have been plotting and planning for the last two years.  Our
front yard was about 75%  grass.  In this city, there is a NO pesticide 
NO herbicide by-law.  The past few summers have also had some serious
watering restrictions.  I felt really crappy about trying to keep a green
lawn knowing it was such a waste of a valuable resource. So we
just gave up on our grass in the front.  Weedy, yellow grass, it looked very
neglected. I'm sure our neighbours loved that!
  I've been studying the gardens around us and
 what is doing well in our extreme weather conditions.
We wanted low maintenance, xeriscaped buffet for the birds and
 bugs.  In time we would like it to look slightly overgrown, and a little
bit wild, creating a warm welcoming entrance to our home.  


Just for the heck of it...
here are some old pictures of the front yard.


This was a ton of work!  Extremely labour intensive, but worth every sore
muscle and every broken nail ;).
 We started the project in March.
 The weather was amazing, and the plants I wanted were
 in stock at the local nurseries.

We removed the grass with a rented sod cutter.  As soon as the sod was lifted
out and the blank slate was exposed, I knew we made the right choice.
The ground underneath was terrible.  Rocks and clay.  No wonder the grass
couldn't handle the heat!


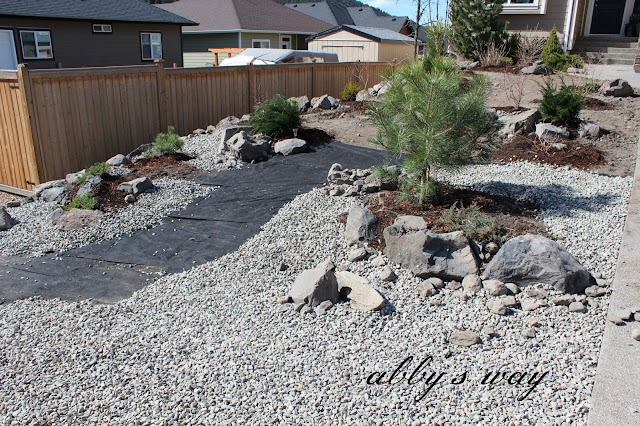
We moved some boulders around to open up the top portion of the garden
and created some random tiers to help with the slope. 
Living in a higher elevation, I knew I wanted it to work with our surroundings.
Working towards a natural mountain trail look,  
boulders were the obvious choice.


Deep, wide holes were dug, adding a lot of wood chips and compost to each hole,
 creating an organically rich enviroment for my new babies to thrive in.


 I am hoping over time it will all fill in and fade out the path edges. 
We planted variegated dogwood, fragrant sumac, potentilla, ninebark, mugo pine,
junipers, and one more Austrian pine.  I am on the look out for some variegated irises
or woodland bulbs to plant along the path edges.


Once everything was planted and thoroughly soaked, the drip line was installed.
This will be a wonderful water saver. Water being delivered right
to the roots.  No evaporation or waste on the road or drive way.
 Then, thick landscape fabric was laid
 below the rocks and the gravel pathway,
  reducing the amount of weeding.


However, I left the area under the wood
chips free of the landscape fabric so I can enrich that soil annually,
 and possibly add some more plantings if I
get the urge. ..ha....if I get the urge :)?!?
  

 We were able to re-use the solar lights along the path. I nestled
them in amongst the rocks and wood chips. The copper
works beautifully with everything.


Creating a pathway 
 seemed to work well in breaking up the length of the front garden and it
also connects the basement entrance pathway to the front door.


View from our front door...


And there you have it...hope you enjoyed seeing our changes.
Thanks for stopping by!

Link Parties