Showing posts with label craft. Show all posts

Tulips in Bloom,

Morning!  Yesterday we had a beautiful morning. I managed to take a few photos of where our garden is at before it changes again. It's a small garden and I want a lot from it. Herbs, veggies, fruit, flowers, privacy, water feature....and of course refuge.


Plants are filling out.


Last winter was a tough one. I lost a new little tree we planted last spring and some plants.  My Mock Orange for instance, had a lot of die back this winter.  Every spring this guy struggles, any suggestions? 


May long weekend and the ground is ready for all my baby seedlings to be planted.  This year I am putting  more thought into the planning part of the process, and a bit more selective with the plants that stay. Also, reseeding the patchy grass from winter and Yzerman...it's an on going process.


Usually the trees are covered in honey bees, or pollinators, but not this year. I did manage to catch a photo of this bumble bee in action.  I'm try to get a photo of the hummingbird that visits this tree too, she is just too darn quick!


Clearly I have a lot of work to do.  Lots of clean up, planting and edging, but if I wait until it's perfectly photo ready, there wouldn't be any pictures.  I do hope you enjoyed the quick garden tour anyways.


Mother's Day weekend was a lot of fun.  We packed a lunch and we spent an afternoon quading.
We got to enjoy two of our three daughters.


My husband checking out the bike he just rebuilt. He says it still needs some tweaking.


Sometimes I take my camera and take photos. Does that look like a heart to you too?


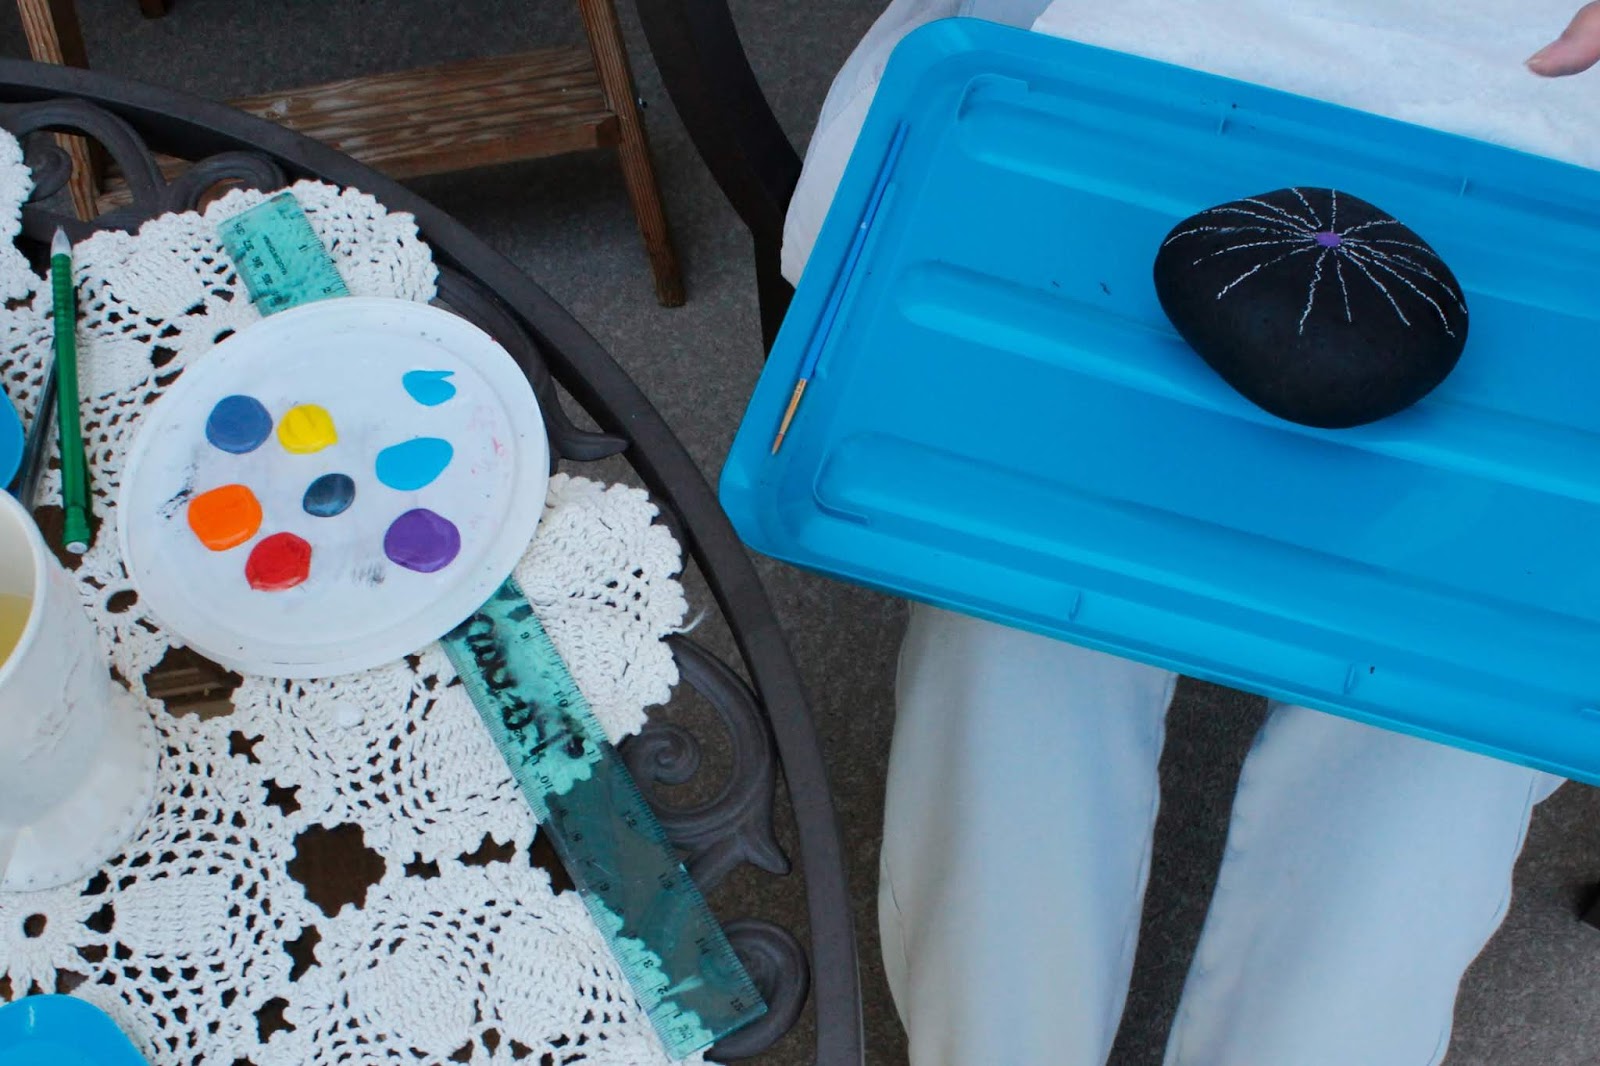
The next afternoon we painted rocks.  First Shayla sprayed painted them a flat black as a base.  When they were dry we drew a few lines with chalk as a template, then dotted them up with paint and the end of a paint brush.


The chalk will be wiped off and then I think I'll seal them with a top coat.


Lot's of fun to make, and all the supplies we had at home. The welcome rock will go at the front door and the other two will be in planters around the garden or on the deck.

I hope you are well and are finding joy in every day.
Until next time, Abby

Adding trim to a bought curtain

With all of the snow falling outside, it is a perfect time for 
some much needed spring cleaning. 
Time to sort out our home, and work on some unfinished projects.
 It seems like every spring/late winter there is a room or two that needs  painting, a closet to clean or items to be replaced,but this year I have a need for change. 
We have been in this house for over six years. Almost a record for us.  And my inner self is screaming for change.  We don't want to move, I really enjoy life here.  We get a lot of good energy and happy feelings in this house.  Like a warm hug.  So we aren't moving anytime soon.  But to cure my need for change, I have been working room by room.  Painting, moving furniture,
changing out pillows, and adding some new details.
  And that's what I am doing with my 
weekends from work.  I have gotten to know
 the paint guy at Home Depot on a first name basis!
More on the painting later, but in the mean time I want to
 share a project that I have been working on
for the last few days.  

My master bathroom curtain.


I wanted to have a nice lacy piece to cover the window.  Privacy isn't 
an issue because it has a frost finish to the glass.  Something that would let the light in 
and still feel cosy through all of the seasons.  
This was a curtain that I bought at JYSK but it ended up being 
way too long.   I cut the extra length off the bottom, then finished the edge 
with my sewing machine.


I found a crochet pattern that would work nicely with the
 fabric on a Youtube  video. 
I'm loving the cute little flowers, 
 However, I am just learning to crochet, so this probably looks a little
rough to you, but I am ok with that.  


Once the trim was complete, I sewed it to the
right side of the bottom of the curtain. 


Super fun, adding the perfect detail to an otherwise simple curtain.


Have a great day!
Abby


Macrame Hangers

Hello!
Happy Fall!
We have raced right through summer, and I didn't even post!
I seem to do that...take summers off.
I don't know why I do it, I always love
going back through my posts and checking out
the changes that we've made through our house. 
Inside and Outside.
Speaking of which, yesterday marked our 6 year anniversary!
Oh my goodness!
I think I need to do another before and after post of 
all the changes we have made to our home...
SIX YEARS!


This time it's been so long, that when I opened my blog today
I realized that my blog roll is gone!!!! and that top bar of links
is missing too...not sure what that is about, but I will be 
linking my favorites back up gradually....it takes me a little time.

Anyways, today is a quick tour or the
ever so slight, fall decorations I put through the main
living space. 
 Next post I will show our Witch's Cottage.

,

When I was in Winners I found these fun napkins, I was hoping for 
a table cloth or throw pillow covers, but these will do!
I layer them over a larger tablecloth to add to their impact,
and who doesn't like some good layering!
The navy and brass are perfect with the dark wood table.

In the kitchen we were finding that we were closing the blinds to give our
neighbors below us a little more privacy.  In turn, shutting
the sunshine out too!  
So, I've come up with a solution for the time being...


a low placed cafe curtain.
It seems like we are still looking down on them in
this picture, but I was standing on the island trying to get a
nice picture of the window, I don't usually do that ;)
But, I never seem to close the blinds
anymore.  Lots of light can shine in now.
There was a succulent that sat in the sun on
that window sill, but I couldn't see it anymore so
  I 'You Tubed' a how to video
and made a few little mini macrame hangers.
So easy and slightly addictive :)


I hung a little hook with an anchor in the ceiling so it wouldn't crash down
on anyone, I always hate messing with ceiling gyproc,
it's not as easy to repair.


This succulent wasn't getting enough light so
it was stretched right out, reaching.
I cut off the top half and shoved it into
the soil...we'll see if it survives.


And I made another hanger for the dining room.
(addictive)


Macrame hangers can be made from jute,
yarn, or strips of fabric of any kind.
Keep in mind the strips need to be about 1.5 times the length
of your finished product.  My windows are longer and I
wanted them to hang a little lower
 so I used a LOT of jute.

Happy Crafting!


Slipcovered Patio Set

With our youngest graduating in a week(!!!)
we have been getting the house all shiny and ready
for our families to come and enjoy our celebration.
A very exciting event in our lives!

Today when I was cleaning the patio and washing the slip covers
 I realized how Uhhhgg- lee 
the cushions underneath were.   
  What a difference the covers have made to our patio....


compared to the before picture below...


I made these cushion covers from painters drop cloth 
as well as the pillow covers.
I stencilled the pattern on top with fabric paint. 
Not expensive, and exactly the look I am going for.


I purchased this planter last year at Winners\Home Sense,
I had no idea what I was going to plant in it, but I knew
it would work well with this refreshed patio.
This is my first year growing succulents....
I LOVE THEM! 
I am really hoping that they will overwinter for me.
Hope you enjoyed seeing the transformation.

Laundry Day


If you have visited here before, 
you know I have gradually been painting every room. 
 Exchanging the dramatic colors 
for a 'quieter' atmosphere.
I have painted a lot of walls/rooms in my lifetime,
 always, I am amazed at how the room changes with paint. 
 Finally, I have mustered up the courage to face the laundry room
it has been taunting me for 5 years...
has it been 5 years???
Small awkward spaces are physically challenging to paint.
A little painting and yoga!


I got all the sample pots of the swatches I liked, then tested them on the wall. 
 I just couldn't decide what color to use.  I liked the idea
of using a cottage green, but they just weren't working for me.


They weren't working with the adjoining spaces either.


After checking the colors with lights on and the lights off,
checking to see how they look coming into and out of the room,
it became clear that I am still loving Normandy Gray.
Which is the grayish blue color I used in the living room.


Everything removed from the room, I repainted.
I did a little editing as well.
Note to my Mum: THE DRYER IS FIXED!!!
Before it sounded like a jet plane 
hovering over our laundry room...
it was taken apart, and with the help of you-tube, repaired.
 :))))


repainted the jacket holder,
(I'm a big believer in reusing and recycling)


...Black Chalk Paint with a stencil...


distressed and dressed up my plastic storage baskets...


 and hung a mirror.
I'm looking for an ornate mirror 
but I haven't found IT yet, for now, this one will do.
If you look top right corner, in above picture, you can see it.


 Tada!


Now this room feels fresh and calm.
An inviting welcome home.

Thanks for visiting!